how to: remove grease pencil markings

Hey sweethearts, happy Monday!

Today’s how-to is easy peasy, but it’s also super handy, as many, many, many thrifts use grease pencil (aka wax pencil) to mark prices on items, ranging from from shoes to dishes and pretty much everything in between. Fortunately, removing these marks is a super-simple two-step process!

You’ll need: A bottle of 100-percent acetone (found with nail polish remover) and cotton pads or a soft, clean rag.

Step one: Dab some acetone on your cotton or rag.

Step two: Give the markings a little rub and watch them vanish!

Annnnd, you’re done! So easy right? This little trick works for taking grease-pencil prices off the soles of thrifted shoes, glassware, you name it. USE CAUTION, however, when using acetone on painted surfaces, as it can also remove the paint, along with the wax. Test in an inconspicuous location or try another method. Under NO circumstances should you ever use acetone on finished wood.

Wishing you a wonderful, albeit snowy, evening!

xo,

Meghan

’tis the season (to clean out your closet)

tumblr_mgs0roXvCe1r2phi9o1_1280With the first days of fall under our belts and the weekend around the corner, it seems like a natural time to get geared up for a closet clean-out. No matter how many purges my wardrobe and I have undertaken together, mentally preparing beforehand continues to be an essential step in the process. Here are the six things I remind myself before embarking on a seasonal mission of minimizing.

1. You’ll need to go it alone. Those articles that encourage you to invite a pal over and open some wine while you go through your closet together…forget that! A closet clean-out is an inherently dirty, personal and emotional task, one that’s best attacked alone. That said, who am I to turn down expert guidance? My friend Sally McGraw authored Already Pretty, an incredibly friendly, honest and uber-positive guide to defining, refining and owning your one-of-a-kind style. To help psych me up, I reread pertinent portions (chapters 2, 5 and 6 if you must know)…there’s something about Sally’s writing and sage advice that keeps me focused on the bigger picture. (Craving hands-on help? She’s available for style and closet consults, either in-person or online, too.)

2. It’s not going to take an afternoon. Sure, if you’re looking to skim off the top and barely make a dent, you’ll probably be set after an hour or two of work. But in case you’re a hoarder like myself, you may have a lot to cull through, and setting a short time limit could add unnecessary pressure, especially if you’re going to try everything on (which you absolutely should). Personally, I prefer to set myself a deadline a week or two out, and then carve out time when my schedule allows. A half-hour here, an afternoon there, just pick a category—pants, purses, accessories, work skirts—and get to work.

3. You’ll need a system. When tackling a wardrobe reboot, I bring an entire BOX of garbage bags upstairs with me, setting aside a bag for items that need dry-cleaning, one for pieces hurting for repair or tailoring, another for clothing that I could potentially resell (or find a new home with a friend) and the rest for items that are destined to be donated. (Clothing that’s worn-out, ratty or ruined is earmarked for the rag pile.)

4. Facts will be faced. Paid top dollar for a pair of boots you’ve only worn once? Scored a gorgeous designer piece that isn’t really your style, but it was SUCH a deal, you can’t bear to let it go? Haven’t fit into your “favorite” pair of jeans in years? Just. Be. Honest. The fact you that once upon a time you were fiscally irresponsible/had bad judgment/size 8 isn’t anything to be ashamed of. We’re only human, y’all! In fact, getting rid of pieces that bring up of feelings of disappointment, shame or self-loathing can be downright cathartic, especially when you consider all the room you’re making for pieces that make you feel AMAZING.

5. Letting go can be hard. One truism from Sally’s book that consistently stands out to me is “Clothing is imbued with emotion, steeped in memory, and parting with it can be downright painful.” Not to mention stressful! Get ready for emotions to arise when making decisions about what to keep and what to part with. One trick that helps me maintain objectivity is asking “If I were to see this item at a store today, would I buy it?” If the answer is no, the attachment is purely sentimental. Take a minute to remember the good times you had together. Then, let go.

6. A good exit strategy is key. Now that you’ve done all the hard work, it’s time to get your unwanted goods out of your house ASAP.  For me and my crazy schedule, finding an organization with convenient drop-off donation service is a must. Savers recently opened eight Donation Drop Stations in Minnesota, including metro-area spots in Robbinsdale, Apple Valley, Columbia Heights and Richfield. Every donation made not only gives gently used goods a second life and keeps them out of landfills, and also supports local nonprofits like the Epilepsy Foundation of Minnesota, the Lupus Foundation of Minnesota  and Vietnam Veterans of America. Savers pays these local organizations for every single donation made, whether or not it makes it to the sales floor. With locations close by, and convenient drop-off hours (9 a.m. to 5 p.m. seven days a week), getting your unwanted clothes at Savers makes total sense. (Just don’t forget to ask for a receipt!)

Y’all cleaning your closets out this fall? If so, I’d love to hear your tried-and-true tips for maximum effectiveness. My overstuffed drawers and I could use the advice!!

xoxo,

Meghan

P.S. My friends at Savers sponsored this post, but all opinions are my own.

the beauty thrifter is in!

phontoOn the hunt for a floral-inspired May Day project or homemade Mother’s Day gift idea? If so, pop over to Coupons.com’s blog to learn how to make these insanely easy coconut-oil bath truffles. They smell absolutely divine, can be made ahead of time and are easily adapted to include your favorite dried flowers, herbs and essential oils. My go-to combination includes rose petals, dried calendula and lavender oil, but truly, the sky’s the limit regarding what you can whip together! To get the entire scoop, head over here.

xoxo,

Meghan

a beginner’s guide to power-hour thrifting

high plains thrifter // power hour thrifting

If I had a dollar for every time someone said to me “But I don’t have time to thrift!”, I’d be RICH. Hitting a thrift when you’re super-tight on time isn’t only doable, it can be downright fun (if you do it right). Whether you’re thrifting over your lunch break, as I commonly do, killing time before an appointment or sneaking away for an hour while the kids are at practice, here are my tried-and-true tips for maximizing your next thrift-store pop-in.

Preparation is everything.

When Roman statesman and philosopher Lucius Annaeus Seneca noted “Luck is a matter of preparation meeting opportunity,” I doubt if he was talking about thrifting, and yet, his words ring so totally true. If you want to get lucky on your next thrift-store power-hour, you’ve gotta have your ducks in a row.

Know where you’re going.

high plains thrifter // screen grab

If you’re visiting a new-to-you thrift, make sure you map out directions and so you don’t spend your thrifting time driving around in circles. (Been there, done that!) Most thrift-store websites, Goodwill included, should be able to link you directly to Google Maps. And for goodness sakes, check to make sure the store will be open too!

Bring a list.

high plains thrifter // power-hour thrifting

Just like grocery shopping without a list can turn into a train wreck, if you don’t know what you’re looking for at the thrift, it’s practically impossible to be in-and-out in under an hour. It’s simply too overwhelming! To avoid aimless aisle wandering, I review my running list of wants before I head out. (I keep my list on my phone, since I know I’ll always have it with me, but a small notebook does the trick too.)

I’ll also scan my Crafts, Projects & Plans Pinterest board so I can see what I’ve pinned recently and might need supplies for. Finally, I try to peek at my calendar to see if there are any events or holidays I should be planning or stocking up for. Having a detailed list in hand helps me stay focused, even at at big, busy stores.

Get to it.

high plains thrifter // power-hour thrifting

List in hand, get down to business! Since I wear dresses and skirts 99.9% of the time, that’s the section where I always start. Shopping stores that are organized like Goodwill, where clothing is sorted by size, makes it so much easier to be quick and efficient!

Be realistic.

high plains thrifter // power-hour thrifting

A thrift-store power-hour is not the time to:
-try clothes on
-check to see if electronics work
-dig through bargain bins
-read book jackets
-flip through piles of vinyl
-bid on silent auction items
-buy furniture (unless the store policy allows them to hold it for you so you can haul it home)

Go with your gut.

high plains thrifter // power-hour thrifting

Sometimes an item will present itself to you that you simply have to have. For example, a wicker serving tray wasn’t on my wish list, but when I saw this one, a fun makeover idea for it sprung to mind, and so I snapped it up. To avoid (impulse) buyer’s remorse, set a dollar-amount cap for spontaneous purchases. (Mine’s $10, for what it’s worth.) You can always come back tomorrow, you know?

It’s OK if you don’t find anything.

DSC_7513

Leaving a store empty-handed does not make your trip a failure! Being “lucky” in thrifting requires persistence and patience, and sometimes, it’s just not in the cards. Do not waste your money buying something just for the sake of “making your trip worthwhile.” You know it’ll just wind up adding clutter to your home, closet or bookshelf!

Armed with these tips, I hope you feel more ready to hit the thrifts, even if all the time you have is just one hour. If you have any go-to tips for thrift-store shopping on a tight timeline, please share ’em in the comments section so we can learn from each other’s wisdom!

xoxo,

Meghan

P.S. A version of this post first appeared on the Goodwill/Easter Seals of Minnesota blog.

Photos c/o: Julia McMahon, LB Jeffries Photography

how to: make reed diffusers using thrifted vases

Come mid-winter, I straight-up yearn for open-window weather. I love the sounds of my neighborhood, but more than anything, I crave fresh air. Since we have at least a couple months to go before it’s warm enough to crack the windows, I’ve been keeping things fresh at home with these easy-to-make reed diffusers. Crafted out of with Goodwill vases and few ingredients—including a few you probably already have on hand!—this project comes together in about 15 minutes, and costs a mere fraction of store-bought air fresheners.

WHAT YOU’LL NEED

  • 2 thrifted vases — I looked for vases with narrow necks that were no more than five inches tall
  • Mineral oil — available at your local pharmacy and/or hardware store
  • Vodka
  • Carrier oil — sweet almond, jojoba and safflower oils will all work great
  • Essential oils — single-note oils or blends are both great options
  • Wooden reeds — I found mine at Michael’s

HOW TO MAKE

1. Start by gathering up your supplies.
diffusers step 1
2. Measure ½ cup of mineral oil into a glass measuring spout.
https://i0.wp.com/blog.goodwilleasterseals.org/wp-content/uploads/2014/01/diffusers-step-2.jpg
3. Add 2 to 3 tablespoons of vodka. It’s naturally going to separate, so give it a good whisk to ensure it’s emulsified.
diffusers step 3
4. Now it’s time to mix up your scents. To keep it simple, I used two of my favorite essential oil blends: Veriditas Botanicals’ Good Samaritan blend and Aura Cacia’s Creative Juice. The sky’s the limit when it comes to essential oil combos, so feel free to play around! As long as you’re stay around 20-30 drops per ¼-cup carrier oil, you should be in good shape.
diffusers step 4
5. Using a small funnel, pour the carrier-oil blend into a vase, followed by half the mineral oil-vodka mixture. Repeat with your second vase.
https://i0.wp.com/blog.goodwilleasterseals.org/wp-content/uploads/2014/01/diffusers-step-5.jpg
6. Insert a handful of the reeds into each vase, stirring the oil around. After a few hours pass, flip the sticks over, so the end that hasn’t been dipped gets a turn in the oil. For the most fragrant results, flip your sticks every few days. Depending on the size of your vases, these diffusers should stay fragrant for at least a month or two.
https://i0.wp.com/blog.goodwilleasterseals.org/wp-content/uploads/2014/01/diffusers-finished-1.jpg
Are you a fan of homemade air fresheners? If you have a good method or recipe up your sleeve, please do let me know!
xo,
Meghan
A version of this post first appeared on the Goodwill / Easter Seals Minnesota blog.

how to: make an air plant display

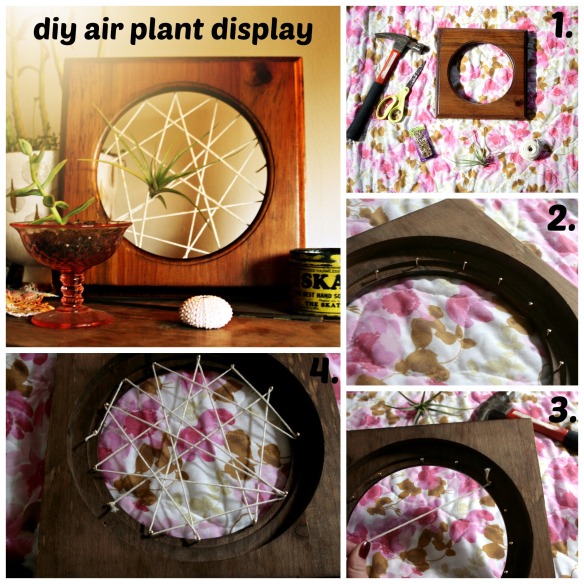
high plains thrifter // diy air plant display  Got a minute? If so, pop on over to the Goodwill/Easter Seals blog to learn how to make a display for air plants using thrifted picture frames. An ideal DIY for folks with short attention spans (like me!), this easy-peasy craft takes all of 10 minutes to complete. But don’t take my word for it, check out the full how-to here!

xoxo,

Meghan

how to: remove salt stains from boots

high plains thrifter // how to remove salt stains from boots

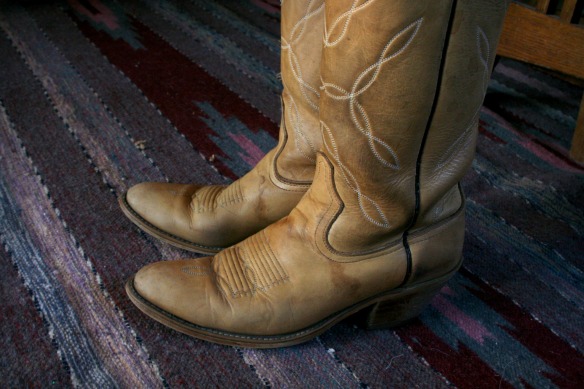
By the time mid-February rolls around, my relationship with winter hits a wall. From daily traffic battles on ice-slicked highways to cutting winds that spring tears to my eyes to sky-high heating bills, I’m just so over it all. Including, if not especially, my entire winter wardrobe. But since there are at least a few more weeks* of boot- (and wool-) wearing weather ahead, I must resolve to get through the tail-end of winter as stylishly as possible. First up on my to-do list? Cleaning my trusty, wear-with-everything, thrifted cowboy boots, which were, up until yesterday, marred with salty stains.

salt stain close-upIn need of some tips on how to give salt stains the slip, I turned to Google, and found posts galore on removing salt from both suede and leather boots. I mashed up advice from two posts (this one from the Free People blog and this one from 11 and Chic), and am stoked on the results. Here’s how I did it!

First up, I gathered up the necessary supplies, all of which I had on hand. (Which made me feel worse about not tackling this task last winter!)

high plains thrifter // salt stain removal suppliesI started off by giving my boots an all-over brushing, removing any gritty bits of salt and sand wedged in the stitching or soles. (The tutorials I read called for a shoe brush, but a spare nail brush I had worked just fine.)

high plains thrifter // how to remove salt stainsIn a small pitcher, I mixed a 1/4 cup of vinegar with a 1/4 cup of water. Dampening the rag with the vinegar mixture, I dabbed over all the areas stained by the salt, hitting the especially heavy stains a few times, just to make sure they were completely covered.

high plains thrifter // how to remove salt stainsWhen I finished that step, they looked like this. And when I left them to dry, I felt a little more than a little skeptical that this was going to work.

high plains thrifter // drying bootsAfter running a few errands, I came back to find dry boots. Using another clean rag, I buffed them up, using a quarter-sized dollop of leather conditioner at a time. And the results? Fabulous! Yes, my poor boots still bear a few lingering signs of water damage, but given their age and the multiple winters’ worth of abuse they’ve sustained, I’m pretty pleased with how they turned out!

finished boots2

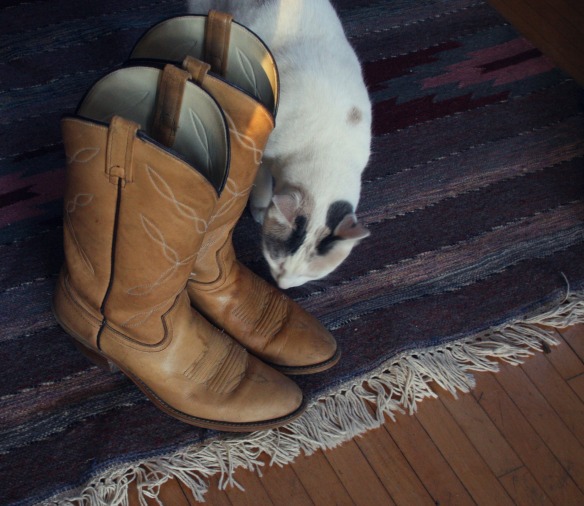
Tammy Crackers is curious about where the salt stains went.

high plains thrifter // finished bootsDo you have any tricks for keeping your winter boots looking better? If so, let me know!

xoxo,

Meghan

*please let it be weeks versus months!

how to: polish vintage stainless with olive oil

high plains thrifter // how to clean stainlessWay back in December, my honey and I stopped at the Treasure Chest thrift store near Saint Cloud on our way to his family’s Christmas party. Everything in the store was half-off that weekend, including this fondue pot, which wound up coming home with me. Still in its original box, the poor thing was by no means beat-up, but still bore a few signs of use.

high plains thrifter // how to clean vintage stainless with olive oil In need of some advice on how to spruce it up, I turned to Google, and found this handy post on Apartment Therapy explaining how to use olive oil to polish stainless steel. Intended to advise folks on how to buff their stainless appliances, I found it helpful too, for sprucing my fondue pot.

I started out by giving it a thorough bath (minus the wooden handle and burner, of course).

high plains thrifter // how to clean vintage stainless with olive oil After all the pieces were dry, I followed the instructions on the Apartment Therapy post, using a clean, dry wash rag to buff a few teaspoons of oil on, flipping the rag midway through. Elbow grease = essential.

high plains thrifter // how to clean vintage stainless with olive oil I’m so pleased with how clean and shiny it looks now.

high plains thrifter // how to clean vintage stainless with olive oil Do you have any tricks for getting your vintage stainless in tip-top shape? If so, do let me know how you do it in the comments!

xo,

Meghan

how to: not be an idiot at the tailor

While this post is from the summer of 2010, Sew Simple remains my go-to spot for all my alterations. Since they just opened the doors to their new location (yay!), I thought it’d be a good time to refresh this post with updated info and additional tips.

Confession: I can’t sew for shit. My most recent accomplishment involving a needle and thread was sewing buttons onto a shirt of my sweetheart’s—a task that took me approximately an hour and an extra-large whiskey ginger.

It’s understandable then, when I need something hemmed, patched or repaired, I take it to the pros. Like Pahoua Hoffman and her mom, Chia, at Sew Simple, a-cute-as-a-button operation (conveniently located in the same building as my favorite Chinese takeout joint) that specializes in speedy, affordable alterations and tailoring. Since taking your thrifted vintage in to a tailor can be a bit intimidating at first, I thought, with the help of Sew Simple’s pros, we could cover some basics so your next visit is a snap.

1. Learn some basic lingo.

Knowing what to ask for is half the battle, and getting some simple terms down will definitely help you to not sound like a fool.

Hem: A hem is made when the bottom edge of a garment is folded over once, folded over again and then sewed down. A simple hem is when the garment is unlined. If you want a maxi dress made into a mini, or pants made into shorts, hemming is what you want. This also applies to shortening shirt hems, sleeves, jackets…anything with an edge.

Original hem: At Sew Simple, you can choose to have a simple hem (described above), or you can opt to keep the original hem (also known as a Euro hem) where the extra length is tucked under and sewn in such a way that the original hem is kept intact. This option is good for when you want to keep a detailed hem or maintain the same thread color used on other parts of the garment.

Taking in: The process of taking in an item makes it smaller for a more fitted silhouette. If you love a skirt, for example, but the waist is slightly too big, this is what you ask for.

Let out: The process of opening the seam allowance (definition below) to let out the extra fabric to create a looser fit. This is what you want to ask for if you thrifted a blazer or dress and the fit is a little too snug.

Seam allowance: A seam allowance is the area between the edge of fabric and the stitching line on two (or more) pieces of material being stitched together. Seam allowances can range from 1/4-inch wide  to as much as several inches. If you’re hoping to have something let out, check the seam allowance. If it’s small (like 1/2-inch or less), your tailor won’t be able to do much.

Lining: Lining is an inner layer of fabric, fur or other fabric that provides a nice, neat finish.

Seam: A seam is a line of fabric held together by thread.

2. Have realistic expectations.

Don’t get your hopes up; not everything is reparable. “We’ll tell you when we can’t fix something,” says Hoffman. Bringing your item in to a tailor is a good first step (don’t call and try to explain what you want fixed over the phone!). Consultations are often free, as is the case at Sew Simple.

Don’t expect that your garment will look “perfect” or brand-new, especially if you’re getting holes repaired, Hoffman cautions. “Most people who understand what vintage is are just happy that their garment is wearable again,” she says.

Don’t plan on being in and out in a flash. You will need to allot time to explain to your tailor what you want done, and if you want the fit altered, you’ll need time to try the garment on and have your tailor work with you to hatch a plan.

Some fixes need more of a designer’s touch, for example, if you want to reconstruct a piece or alter is drastically. An experienced tailor will know when something is beyond their skill level, and can refer you to a designer who can help. Sew Simple has relationships with local designers who can help you with a more creative project and can refer you to them.

3. Don’t go empty-handed.

Do bring (or wear) the underthings you’ll be wearing with the piece of clothing you want altered or fixed. It’s amazing the difference that foundation garments (a strapless bra or pair of Spanx, for example) can make in terms of fit. Also be sure to bring the shoes you’ll be wearing with the item—heels, flats, etc.—this goes for guys, too!

Do bring your wallet. Most tailors require full or partial payment in advance. Pricing varies per tailor, per repair. Most tailors will give you a quote for every piece. Sew Simple has a handy list of prices for common alterations, which you can check out here. (Handy much?)

Do be prepared to wait for your goodies. Your tailor should be able to give you a ballpark range of when your garment will be ready—usually in a few days to a week, with more complex alterations taking longer. If you need it in a jiffy, let them know, and they might be able to rush it through. At Sew Simple, there’s no fee to put a rush on an item, but be ready to shell out a bit more for faster service at other tailors.

A big thank you goes to Pahoua and her mom, who were ultra-helpful with putting this post together. Keep your eyes out for more tailoring-related posts featuring wisdom from the friendly folks at Sew Simple!

Sew Simple
Hours: Monday-Saturday, 11 a.m.-7 p.m.; Closed on Sunday
Location: 2424 Nicollet Ave., Minneapolis, MN 55404
Contact: Phone, 612.872.4430
They’re also on Facebook and Twitter!

xo,

Meghan

holiday how-to: DIY mulling spice kits

mulling spice kit // high plains thrifterThere’s nothing more gratifying than giving a homemade gift. I know it sounds cheesy, but the heartfelt aspect of making and giving just can’t be matched buying store-bought presents. In order to save money, time and sanity during this busy holiday season, I’ve learned (the hard way, some years) how important it is to find ideas that can be made ahead, multiplied and don’t require a ton of expensive specialty supplies. Which is why I’m so stoked about these cute mulling spice kits I made for the craft swap.

mulling spice group // high plains thrifter

It’s seriously the easiest gift to make! Start by finding a mulling spice recipe you like (or make up your own, as I did!), and then figure out how to scale it to suit your gifting needs. (I needed to make about 40-50 gifts, so I sought out a big-batch recipe and followed those proportions.) The combination I came up with melded a couple recipes and included star anise, dried orange and lemon peels, broken cinnamon sticks, whole allspice berries, cloves, cardamom pods and some chopped crystallized ginger. Once you shop for your spices and get your orange or lemon peels dried, dump it all into a bowl, stir it up and take a big whiff.

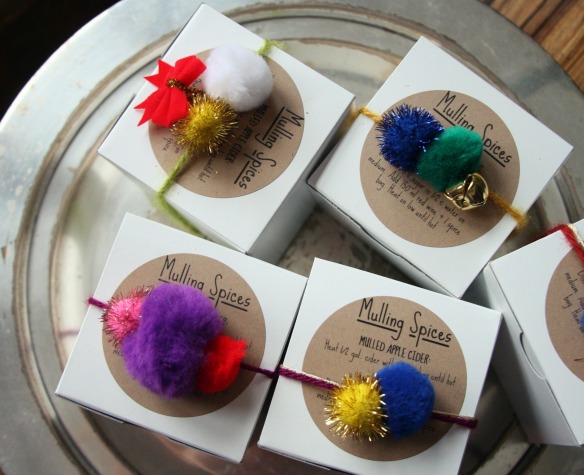
Mulling Spice Mix // high plains thrifterAfter that, I divvied the yummy-smelling spice mixture up by the heaping 1/4-cup full into  muslin sachets. I found the sachets at my co-op for 15 cents a pop, but you can also get them in bulk here. Then I popped each sachet into a 3 x 3-inch white paper box found (on sale!) at The Container Store. Each box got topped with a sticker featuring directions on how to use the spices, a cute template I found here on 30 Pounds of Apples. (I had no idea craft-paper sticker paper was a thing!)

mulling spice kit // high plains thrifter

Then came my favorite part…making them cute! At first I thought about painting each box, an idea my boyfriend deemed “too much.” (He was, as usual, 100-percent right!) I decided instead to put my bags of thrifted pompoms to use and threaded them with a yarn needed onto leftover yarn. I go nuts if I have to do the same thing over and over and over, so I was happy to decorate each of these in a unique way. I think they turned out darling! Start to finish, including printing the labels, assembling the boxes, making the spice mix and decorating, it took about three episodes of McMillian & Wife (so about three-and-a-half hours). Not too shabby when you consider I now have 40+ gifts ready to go! Combined with my homemade Apple-Cinnamon Jameson, I have just about everyone on my list covered. (Just in the nick of time!)

finished kitsAre you finishing up your handmade holiday projects this weekend or am I the only one who waited ’til the last minute? Either way, I hope your pre-Christmas weekend is absolutely fabulous!

xo,

Meghan